The implementation of JSON Web Token (JWT) authentication for serverless APIs presents a compelling solution for securing modern applications. This approach offers enhanced flexibility and scalability compared to traditional authentication methods. JWTs, being self-contained tokens, encapsulate user information and can be validated without relying on server-side sessions, making them ideally suited for the stateless nature of serverless architectures. This guide delves into the intricacies of integrating JWTs into a serverless API, offering a structured approach from foundational concepts to advanced security considerations.
We will explore the core principles of JWTs, examine the advantages of serverless architectures, and provide practical guidance on choosing the right libraries, generating and validating tokens, and securing API endpoints. Furthermore, this guide will address best practices for implementing refresh mechanisms, managing secret keys, and mitigating common security vulnerabilities. Through code examples and detailed explanations, this comprehensive overview aims to equip developers with the knowledge and skills necessary to effectively secure their serverless APIs using JWT authentication.
Introduction to JWT Authentication

JSON Web Tokens (JWTs) represent a standardized, compact, and self-contained method for securely transmitting information between parties as a JSON object. They are widely used for authentication and authorization in web applications and APIs, enabling stateless authentication, and facilitating secure communication in a distributed environment. JWTs encode claims, which are statements about an entity (typically a user), along with a digital signature to ensure the integrity and authenticity of the token.JWTs provide a standardized way to represent claims securely, reducing the need for maintaining session state on the server-side, thus improving scalability and performance.
They are particularly well-suited for microservices architectures and serverless applications.
Core Concepts of JWT
JWTs function on the principle of digitally signing a JSON object, containing a set of claims. This signature ensures the token’s integrity and verifies that the claims have not been tampered with. The fundamental components of a JWT are:* Header: This section contains metadata about the token, including the algorithm used for signing (e.g., HMAC SHA256 or RSA).
Payload
This section carries the claims, which are assertions about the subject (user). Claims can include user identifiers, roles, permissions, and any other relevant data needed for authorization.
Signature
This section is created by encoding the header and payload, then signing them using a secret key or a private key. The signature ensures that the token has not been altered and that it originates from a trusted source.The structure of a JWT is typically represented as a string of three parts, separated by periods (‘.’): `header.payload.signature`. The header and payload are base64 encoded JSON objects.For instance, a simplified JWT might look like this: `eyJhbGciOiJIUzI1NiIsInR5cCI6IkpXVCJ9.eyJzdWIiOiIxMjM0NTY3ODkwIiwibmFtZSI6IkpvaG4gRG9lIiwiaWF0IjoxNTE2MjM5MDIyfQ.SflKxwRJSMeKKF2QT4fwpMeJf36POk6yJV_adQssw5c`.The components of the JWT are:
Header
`eyJhbGciOiJIUzI1NiIsInR5cCI6IkpXVCJ9` (base64 encoded)
Payload
`eyJzdWIiOiIxMjM0NTY3ODkwIiwibmFtZSI6IkpvaG4gRG9lIiwiaWF0IjoxNTE2MjM5MDIyfQ` (base64 encoded)
Signature
`SflKxwRJSMeKKF2QT4fwpMeJf36POk6yJV_adQssw5c` (HMAC SHA256)
History of JWT
The concept of JWT evolved from earlier token-based authentication methods. Its standardization was driven by the need for a more interoperable and secure way to transmit claims between parties.The key milestones in JWT’s evolution include:* Early Token-Based Authentication: Before JWT, various token-based approaches were used, but they lacked standardization and often had security limitations.
Standardization (RFC 7519)
The formal specification for JWT was defined in RFC 7519, published in May 2015 by the Internet Engineering Task Force (IETF). This standardization was a critical step in promoting widespread adoption.
Adoption and Growth
Following standardization, JWT gained rapid adoption due to its simplicity, versatility, and support for various cryptographic algorithms. It quickly became a preferred choice for API authentication and authorization.
Continued Development
JWT continues to evolve with extensions and best practices, addressing emerging security concerns and adapting to new architectural patterns.The standardization of JWT facilitated the development of numerous libraries and frameworks in different programming languages, contributing to its broad adoption across various platforms.
Benefits of Using JWT Compared to Traditional Authentication Methods
JWT authentication offers several advantages over traditional methods like session-based authentication, particularly in the context of modern web applications and APIs. These benefits include:* Stateless Authentication: JWTs are self-contained, carrying all the necessary user information within the token. This eliminates the need to store session data on the server, improving scalability and simplifying application architecture.
Scalability
Because the server doesn’t store session data, JWT-based systems can easily scale horizontally. Load balancing becomes simpler as any server can validate a JWT.
Cross-Domain Support
JWTs can be used across different domains, making it easier to build single sign-on (SSO) systems and integrate with third-party services.
Performance
JWTs can be validated without accessing a database or session store, leading to faster authentication and authorization processes.
Decoupling
JWTs decouple the authentication and authorization logic from the application servers, enabling greater flexibility in the architecture.
Security
JWTs, when implemented correctly, can be very secure. They can be signed using strong cryptographic algorithms, ensuring the integrity of the token.
Simplicity
JWTs are relatively simple to implement and understand, making them accessible to developers of various skill levels.These advantages have made JWT a favored solution for modern web applications, particularly those employing microservices architectures or serverless functions, where scalability, performance, and cross-domain compatibility are crucial.
Serverless API Architecture Overview
Serverless architectures have become increasingly popular for building APIs due to their scalability, cost-effectiveness, and ease of management. This section provides an overview of the key components of a serverless API and highlights the advantages of this approach.
Key Components of a Serverless API
A serverless API typically comprises several interconnected components that work together to handle requests and responses. Understanding these components is crucial for comprehending how JWT authentication integrates within this architecture.
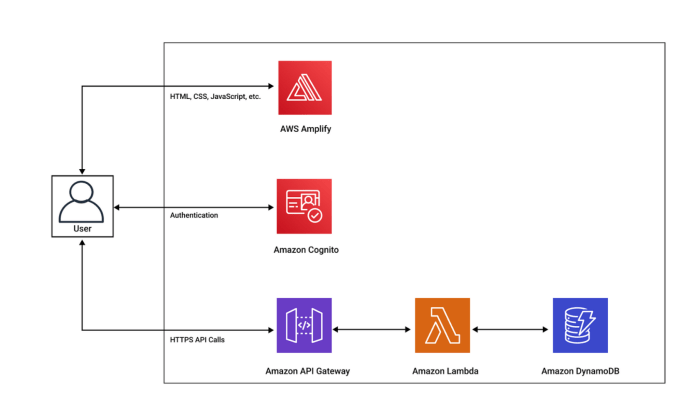
- API Gateway: The API Gateway acts as the entry point for all client requests. It handles routing, authentication, authorization, and rate limiting. It exposes the API endpoints and translates incoming requests into a format that the backend services (e.g., Lambda functions) can understand. Popular choices include AWS API Gateway, Google Cloud API Gateway, and Azure API Management.
- Lambda Functions (or equivalent): Lambda functions are the core of the serverless backend. These are event-driven compute units that execute code in response to triggers, such as API Gateway requests. They are responsible for processing requests, interacting with databases, and returning responses. Lambda functions are stateless and designed to scale automatically based on demand.
- Databases: Serverless APIs often interact with databases to store and retrieve data. These can be serverless databases like Amazon DynamoDB, Google Cloud Firestore, or Azure Cosmos DB, or traditional databases accessed via database connectors. The choice depends on the data model, performance requirements, and cost considerations.
- Authentication and Authorization Services: While API Gateway can handle some basic authentication, more complex authentication and authorization often involve dedicated services. These services can validate JWTs, manage user identities, and enforce access control policies. Examples include AWS Cognito, Auth0, and Okta.
- Monitoring and Logging: Monitoring and logging are critical for the health and performance of a serverless API. Services like AWS CloudWatch, Google Cloud Logging, and Azure Monitor provide tools for tracking metrics, analyzing logs, and identifying potential issues.
Advantages of Serverless Architecture
Serverless architectures offer several advantages over traditional server-based approaches, especially when considering API development and JWT authentication. A comparative table illustrates these advantages.
| Feature | Serverless | Traditional Server-Based | Description |
|---|---|---|---|
| Scalability | Automatic scaling based on demand; no need to provision or manage servers. | Manual scaling; requires provisioning and managing server infrastructure to handle peak loads. | Serverless platforms automatically scale resources based on incoming traffic. This ensures the API can handle any load without manual intervention, unlike traditional servers, where scaling requires manual adjustments to infrastructure, potentially leading to bottlenecks during high traffic periods. |
| Cost-Effectiveness | Pay-per-use pricing model; only pay for the resources consumed. | Fixed costs associated with server infrastructure, regardless of actual usage. | Serverless computing offers a pay-per-use model, which is often more cost-effective than traditional servers, especially for APIs with variable traffic. Users only pay for the compute time and resources consumed. This contrasts with traditional servers, where fixed costs are incurred regardless of the API’s actual usage. |
| Reduced Operational Overhead | No server management required; focus on code and business logic. | Requires server provisioning, maintenance, patching, and security updates. | Serverless platforms abstract away the complexities of server management. Developers can focus on writing code and business logic, reducing the operational burden. Traditional server-based approaches require manual server provisioning, maintenance, and security updates, increasing operational overhead. |
| Faster Development Cycles | Rapid deployment and iteration; streamlined development workflows. | Slower deployment cycles; more complex infrastructure setup. | Serverless platforms accelerate development cycles by simplifying deployment and providing streamlined workflows. Developers can quickly deploy and iterate on their code. Traditional server-based deployments involve more complex infrastructure setup and slower iteration cycles. |
Seamless Integration of JWT Authentication in Serverless Environments
JWT authentication fits naturally into the serverless architecture. The stateless nature of Lambda functions and the capabilities of API Gateways make implementing and managing JWT authentication straightforward.
- API Gateway Integration: API Gateways can be configured to validate JWTs before routing requests to Lambda functions. This eliminates the need for each function to handle authentication logic, simplifying the code and improving performance. The API Gateway can check the JWT signature, expiration, and claims, and then forward the request to the Lambda function only if the token is valid.
- Lambda Function Responsibilities: Lambda functions can focus on handling business logic and data processing. Once the API Gateway has validated the JWT, the Lambda function can securely access the user’s identity and permissions from the token’s claims.
- Centralized Authentication Logic: Services like AWS Cognito, Auth0, or custom-built solutions can manage user registration, login, and token generation. These services can be integrated with the API Gateway and Lambda functions to provide a complete authentication and authorization solution. This centralizes the authentication logic, making it easier to manage and update.
- Stateless Authentication: JWTs are stateless, meaning that the server does not need to store session information. This aligns perfectly with the stateless nature of Lambda functions, enabling horizontal scalability without session affinity.
- Scalability and Performance: Serverless platforms are designed to scale automatically, which means that the authentication process can handle any level of traffic without performance degradation. The API Gateway can efficiently validate JWTs, and the Lambda functions can process requests quickly, ensuring a responsive user experience.
Choosing the Right JWT Library
Selecting the appropriate JWT library is crucial for the security and functionality of your serverless API. The library you choose directly impacts your application’s security posture, ease of development, and long-term maintainability. A poorly chosen library can introduce vulnerabilities, complicate development, and lead to significant security risks. This section will analyze popular JWT libraries across different programming languages, detailing factors to consider and providing installation and configuration examples.
Comparative Analysis of JWT Libraries
The landscape of JWT libraries varies across programming languages. The features, performance, and security focus differ between each implementation. Understanding these differences is essential for making an informed decision.
- Node.js: Node.js boasts several mature and widely adopted JWT libraries.
- jsonwebtoken: This is one of the most popular libraries. It provides a comprehensive feature set, including signing, verifying, and decoding JWTs. Its popularity stems from its ease of use and extensive documentation.
- jose: This library focuses on cryptographic operations and is standards-compliant, supporting a wide range of cryptographic algorithms and key management techniques. It is a good choice for security-critical applications.
- Python: Python offers several options for handling JWTs.
- PyJWT: This is a well-established and actively maintained library that offers robust JWT support, including signing, verification, and encoding/decoding. It’s widely used and supports various signing algorithms.
- python-jose: This library provides a more low-level approach, focusing on cryptographic operations and standards compliance. It offers greater control over the JWT process.
- Java: Java has several robust libraries for JWT handling, often used in enterprise applications.
- jjwt (Java JWT): This is a popular and feature-rich library for JWT handling in Java. It is easy to use and provides extensive support for different signing algorithms and key management strategies.
- Nimbus JOSE + JWT: This library offers comprehensive support for JOSE (JSON Object Signing and Encryption) and JWT standards. It is a solid choice for applications that require advanced cryptographic features.
- Go: Go offers a smaller selection, but with libraries designed for performance and concurrency.
- github.com/golang-jwt/jwt: This is a widely used library in Go. It supports various signing methods and is well-suited for high-performance applications.
Factors for Selecting a JWT Library
Several factors should guide your selection of a JWT library, ensuring both security and usability.
- Security Features: The library should support a wide range of signing algorithms (e.g., HMAC-SHA256, RSA-SHA256, ECDSA-SHA256). It should also handle key management securely, allowing for key rotation and protection against common attacks like timing attacks.
- Ease of Use: The library should have clear and concise documentation and an intuitive API. This reduces development time and the likelihood of errors.
- Performance: Consider the library’s performance, especially in high-traffic serverless environments. Look for benchmarks and performance comparisons.
- Community Support and Maintenance: A well-maintained library with an active community ensures that security vulnerabilities are addressed promptly, and updates are released regularly.
- Standards Compliance: The library should comply with relevant RFCs and standards (e.g., RFC 7519 for JWT). This ensures interoperability and compatibility.
- Error Handling: Robust error handling is critical for debugging and security. The library should provide informative error messages.
Installing and Configuring a JWT Library (Node.js – jsonwebtoken)
This section will demonstrate how to install and configure the `jsonwebtoken` library in Node.js.
Installation:
Use npm or yarn to install the library:
npm install jsonwebtoken // or yarn add jsonwebtoken
Configuration and Usage:
Here is a basic example of how to sign, verify, and decode a JWT:
const jwt = require('jsonwebtoken'); const secretKey = 'your-secret-key'; // Store this securely in an environment variable // Payload for the JWT const payload = userId: 123, username: 'testuser', role: 'user' ; // Sign the JWT const token = jwt.sign(payload, secretKey, expiresIn: '1h' ); console.log('JWT Token:', token); // Verify the JWT try const decoded = jwt.verify(token, secretKey); console.log('Decoded JWT:', decoded); catch (error) console.error('JWT Verification Error:', error.message); // Decode the JWT (without verification) const decodedToken = jwt.decode(token); console.log('Decoded Token (without verification):', decodedToken); Explanation:
- Import the Library: The code begins by importing the `jsonwebtoken` library.
- Define a Secret Key: A secret key is defined. This key should be kept secret and should not be hardcoded in production. Environment variables are a better option.
- Create a Payload: The payload is the data you want to include in the JWT. This example includes a user ID, username, and role.
- Sign the Token: The `jwt.sign()` method creates the JWT. The payload, secret key, and options (like `expiresIn`) are passed as arguments.
- Verify the Token: The `jwt.verify()` method verifies the token’s signature and checks its expiration. It throws an error if verification fails.
- Decode the Token: The `jwt.decode()` method decodes the token without verifying it. This can be useful for inspecting the payload, but the data should not be trusted without verification.
Security Considerations:
- Secret Key Storage: Never hardcode your secret key. Store it in environment variables.
- Algorithm Selection: Use a strong signing algorithm (e.g., HMAC-SHA256 or RSA-SHA256).
- Expiration: Set an appropriate expiration time for your tokens to limit the impact of compromised tokens.
- HTTPS: Always use HTTPS to protect the token during transmission.
Generating and Signing JWTs
The generation and signing of JSON Web Tokens (JWTs) is a critical process in implementing secure authentication for serverless APIs. This section details the mechanics of creating and securing JWTs, covering the composition of a JWT, the construction of its payload, and the application of cryptographic signatures to ensure its integrity and authenticity. Understanding these steps is fundamental to building a robust and reliable authentication system.
JWT Structure and Components
A JWT is a compact and self-contained way to securely transmit information between parties as a JSON object. It consists of three parts: a header, a payload, and a signature. Each part is Base64Url encoded and separated by a dot (.).The header typically contains two fields:
- `alg`: Specifies the signing algorithm used (e.g., HS256 for HMAC using SHA-256, RS256 for RSA using SHA-256).
- `typ`: Specifies the token type, which is typically `JWT`.
The payload contains the claims, which are statements about an entity (typically the user) and additional data. The signature is created by signing the encoded header and payload using a secret key or a public/private key pair, depending on the algorithm specified in the header.
Creating a JWT Payload with User Information
The payload of a JWT carries the claims. These claims are pieces of information about the user or the token itself. They are represented as key-value pairs within the JSON object. Common claims include:
- `iss` (Issuer): Identifies the entity issuing the JWT.
- `sub` (Subject): Identifies the subject of the JWT (the user).
- `aud` (Audience): Identifies the intended recipient of the JWT.
- `exp` (Expiration Time): Specifies the expiration time of the token.
- `iat` (Issued At): Specifies the time the token was issued.
- `nbf` (Not Before): Specifies the time before which the token is not valid.
- Custom Claims: Application-specific claims containing user roles, permissions, or other relevant data.
Example Payload:“`json “iss”: “your-api.com”, “sub”: “user123”, “aud”: “your-client-app”, “exp”: 1678886400, // Example: March 15, 2023, 00:00:00 UTC “iat”: 1678800000, // Example: March 14, 2023, 00:00:00 UTC “roles”: [“user”, “editor”]“`The `exp` (Expiration Time) claim is crucial for security. It defines the point at which the token becomes invalid, preventing its use after a certain period.
The `iat` (Issued At) claim indicates the time the token was generated. The `sub` claim, in this example “user123”, is a unique identifier for the user. Custom claims, such as “roles,” allow the inclusion of specific user attributes relevant to authorization.
The JWT Signing Process
The signing process is the most crucial step in securing a JWT. It ensures the integrity of the token and verifies its authenticity. The signing process uses a secret key (for HMAC algorithms) or a public/private key pair (for RSA or ECDSA algorithms). The choice of algorithm depends on the security requirements and the capabilities of the JWT library.The process can be described as follows:
- Encoding: The header and payload are encoded using Base64Url encoding.
- Signing: The encoded header and payload are concatenated with a dot (.) separator and then signed using the specified algorithm and either a secret key (e.g., using HMAC-SHA256) or the private key (e.g., using RSA-SHA256).
- Signature Generation: The signing process generates a signature, which is also Base64Url encoded.
- Token Construction: The final JWT is created by concatenating the encoded header, the encoded payload, and the signature, separated by dots.
For example, using the HMAC-SHA256 algorithm, the signature is created using the following process:
HMACSHA256(base64UrlEncode(header) + "." + base64UrlEncode(payload), secretKey)
Where:
- `HMACSHA256` is the hashing function.
- `base64UrlEncode` is the Base64Url encoding function.
- `secretKey` is the secret key used for signing.
Using a library like `jsonwebtoken` in Node.js, the signing process can be implemented as follows:“`javascriptconst jwt = require(‘jsonwebtoken’);const secretKey = ‘your-secret-key’; // Store securely, e.g., in environment variablesconst payload = iss: ‘your-api.com’, sub: ‘user123’, aud: ‘your-client-app’, exp: Math.floor(Date.now() / 1000) + (60
60), // Expires in 1 hour
iat: Math.floor(Date.now() / 1000), roles: [‘user’];const token = jwt.sign(payload, secretKey, algorithm: ‘HS256’ );console.log(token);“`In this example, the `jwt.sign()` function takes the payload, the secret key, and an options object that specifies the signing algorithm. The resulting `token` variable contains the complete JWT.
Implementing JWT Authentication in the API Gateway
API Gateways serve as the entry point for all client requests to a serverless API. Implementing JWT authentication at this level offers significant advantages, including centralized authentication logic, reduced load on backend functions, and enhanced security. By validating JWTs within the API Gateway, you can ensure that only authorized requests reach the backend, thereby protecting sensitive resources and streamlining API management.
Configuring API Gateway for JWT Authentication
Configuring an API Gateway to handle JWT authentication involves setting up an authorizer that validates the JWT and determines the request’s authorization. This process varies slightly depending on the specific API Gateway service (e.g., AWS API Gateway, Azure API Management, Google Cloud API Gateway), but the core principles remain consistent.
- Choose the Right Authorizer Type: Most API Gateways offer several authorizer types, including:
- Lambda Authorizer: This is the most flexible option, allowing you to write custom code (in a Lambda function) to validate the JWT. You can implement any validation logic, including verifying the signature, checking the issuer, audience, and expiration, and retrieving user information from claims.
- JWT Authorizer (Native Support): Some API Gateways provide built-in JWT authorizers that simplify the configuration process. You provide the public key (or the JWKS endpoint) for signature verification, and the gateway handles the validation. This is generally the preferred option for simpler scenarios.
- Custom Authorizer: This allows you to define a custom authorizer that integrates with other authentication systems or providers.
- Configure the Authorizer: The configuration process typically involves:
- Specifying the JWT Header: The API Gateway needs to know where to find the JWT. Typically, it’s in the `Authorization` header with the `Bearer` scheme (e.g., `Authorization: Bearer
`). - Providing the Public Key (or JWKS Endpoint): If using a built-in JWT authorizer, you’ll need to provide the public key used to sign the JWT. Alternatively, you can provide a JWKS (JSON Web Key Set) endpoint, which allows the authorizer to dynamically fetch the public keys. This is recommended as it allows for key rotation without reconfiguring the API Gateway.
- Defining the Scope/Permissions (Lambda Authorizer): If using a Lambda authorizer, you’ll need to define the scope or permissions based on the claims in the JWT. The authorizer will return an IAM policy that grants or denies access to the backend resources.
- Attach the Authorizer to API Methods: Once the authorizer is configured, you need to attach it to the API methods that require authentication. This ensures that the authorizer is invoked before the backend function is executed.
Validating JWTs within the API Gateway
The process of validating JWTs within the API Gateway involves several critical steps. The goal is to ensure the JWT is valid, the user is authorized, and the request can proceed.
- Extract the JWT: The API Gateway first extracts the JWT from the `Authorization` header of the incoming request.
- Verify the Signature: The core of JWT validation is verifying the signature. The API Gateway uses the public key (or JWKS endpoint) to verify that the signature is valid and the JWT hasn’t been tampered with.
- Check the Claims: The API Gateway then examines the claims within the JWT to ensure they meet the required criteria. This includes:
- Expiration (exp): Verifying that the JWT hasn’t expired.
- Issuer (iss): Validating that the issuer of the JWT is trusted.
- Audience (aud): Ensuring that the JWT is intended for this specific API.
- Other Claims: Checking any other custom claims that define user roles, permissions, or other relevant information.
- Authorize the Request: Based on the validation results, the API Gateway either authorizes the request or rejects it. If the JWT is valid and the user is authorized, the request is routed to the backend function. Otherwise, the API Gateway returns an error response (e.g., 401 Unauthorized).
Process Flow of JWT Authentication in an API Gateway
1. Client Request: The client sends a request to the API Gateway, including the JWT in the `Authorization` header.
2. API Gateway Interception: The API Gateway intercepts the request and invokes the configured authorizer.
3. JWT Extraction: The authorizer extracts the JWT from the `Authorization` header.
4. Signature Verification: The authorizer verifies the JWT signature using the public key (or JWKS endpoint).
5. Claims Validation: The authorizer validates the claims within the JWT (expiration, issuer, audience, etc.).
6. Authorization Decision: The authorizer determines whether the request is authorized based on the validation results.
7. Request Routing (Authorized): If authorized, the API Gateway routes the request to the appropriate backend function, potentially including user information extracted from the JWT in the request context.
8. Error Response (Unauthorized): If unauthorized, the API Gateway returns an error response (e.g., 401 Unauthorized) to the client.
Protecting API Endpoints with JWT
Securing API endpoints is a critical aspect of building robust and reliable serverless applications. Implementing robust security measures ensures that only authorized users can access sensitive resources, preventing unauthorized data access and malicious activities. This section details strategies for protecting API endpoints using JWTs, focusing on role-based access control (RBAC) and authorization level implementation.
Designing Secure API Endpoint Strategies
The design of API endpoint security must consider the varying access requirements of different user roles and the sensitivity of the data being accessed. A well-defined strategy involves classifying endpoints based on their access level, implementing RBAC, and validating user permissions before allowing access. This approach minimizes the attack surface and ensures data integrity.
- Endpoint Categorization: Categorize API endpoints based on the level of access required. This allows for a clear definition of which endpoints are accessible to which user roles. For example, endpoints can be categorized as public, authenticated, or admin-only.
- Role-Based Access Control (RBAC): Implement RBAC to define permissions based on user roles. JWTs can carry role claims that indicate the user’s role, which is then used to determine access rights.
- Authorization Enforcement: Enforce authorization at the API Gateway or within the Lambda function. The authorization logic checks the user’s role against the required permissions for the requested endpoint.
- Least Privilege Principle: Grant users only the minimum necessary permissions to perform their tasks. This minimizes the potential damage from compromised accounts.
- Regular Auditing: Implement regular audits of access logs and user permissions to identify and address any security vulnerabilities.
Organizing Authorization Levels
Organizing authorization levels ensures a structured approach to securing API endpoints. Different authorization levels can be implemented to control access based on user authentication status and roles. The common levels are:
- Public: Endpoints accessible to anyone without authentication. These typically include endpoints for user registration, login, or public data retrieval.
- Authenticated: Endpoints accessible only to authenticated users. This typically includes endpoints for accessing user-specific data, such as profile information or personalized settings.
- Admin: Endpoints accessible only to users with administrative privileges. These typically include endpoints for managing users, configuring the system, or accessing sensitive data.
Example Authorization Level Implementation:
Consider a serverless API for a blogging platform. The authorization levels could be structured as follows:
- Public:
GET /posts: Retrieves a list of public blog posts.GET /posts/id: Retrieves a specific blog post.POST /users/register: Registers a new user.POST /users/login: Logs in an existing user.
- Authenticated:
GET /users/profile: Retrieves the user’s profile information.PUT /users/profile: Updates the user’s profile information.POST /posts: Creates a new blog post (for authenticated users who are also authors).PUT /posts/id: Updates a blog post (for the post’s author).DELETE /posts/id: Deletes a blog post (for the post’s author).
- Admin:
GET /users: Retrieves a list of all users.PUT /users/id/role: Updates a user’s role (e.g., to “admin”).DELETE /posts/id: Deletes any blog post, regardless of the author.
Implementing Role-Based Access Control (RBAC) Using JWT Claims
RBAC is a security mechanism that restricts access based on the roles assigned to users. JWTs are well-suited for implementing RBAC because they can contain claims that represent user roles. This approach enables fine-grained control over API access.
Steps for Implementing RBAC with JWTs:
- Include Role Claims in JWT: When a user logs in successfully, the server generates a JWT that includes a role claim (e.g.,
"role": "admin","role": "author","role": "user"). - API Gateway or Lambda Function Authorization: The API Gateway or the Lambda function validates the JWT and extracts the role claim.
- Authorization Logic: Implement authorization logic to check the user’s role against the required permissions for the requested endpoint. If the user’s role has the necessary permissions, the request is allowed; otherwise, it is rejected.
Example: Role-Based Access Control in a Lambda Function (Node.js):
const jwt = require('jsonwebtoken'); // Function to verify JWT and extract role function verifyTokenAndGetRole(token) try const decoded = jwt.verify(token, 'YOUR_JWT_SECRET'); // Replace with your secret key return decoded.role; catch (error) console.error('JWT verification failed:', error); return null; // Function to handle requests exports.handler = async (event) => const authorizationHeader = event.headers.Authorization; if (!authorizationHeader) return statusCode: 401, body: JSON.stringify( message: 'Unauthorized: No token provided' ), ; const token = authorizationHeader.split(' ')[1]; // Extract token from "Bearer " const userRole = verifyTokenAndGetRole(token); if (!userRole) return statusCode: 401, body: JSON.stringify( message: 'Unauthorized: Invalid token' ), ; // Define allowed roles for each endpoint const endpoint = event.httpMethod + ' ' + event.path; let allowedRoles = ; allowedRoles['GET /posts'] = ['user', 'author', 'admin']; allowedRoles['POST /posts'] = ['author', 'admin']; allowedRoles['PUT /posts/id'] = ['author', 'admin']; allowedRoles['DELETE /posts/id'] = ['admin']; if (allowedRoles[endpoint] && !allowedRoles[endpoint].includes(userRole)) return statusCode: 403, body: JSON.stringify( message: 'Forbidden: Insufficient permissions' ), ; // Proceed with the request if authorized return statusCode: 200, body: JSON.stringify( message: 'Authorized' ), ; ; In this example:
- The
verifyTokenAndGetRolefunction verifies the JWT and extracts the user’s role. - The
handlerfunction extracts the token from the authorization header. - It checks the user’s role against the allowed roles for the requested endpoint.
- If the user has the required role, the request is allowed; otherwise, a 403 Forbidden error is returned.
Validating JWTs in Lambda Functions
Validating JWTs within serverless functions is a crucial step in securing your API. It ensures that only authenticated users can access protected resources. This process involves decoding the JWT, verifying its signature, and extracting user information from the payload. Failure to validate JWTs properly can lead to unauthorized access and data breaches.
Decoding and Verifying JWT Signatures
The process of validating JWTs within a Lambda function involves several key steps. This includes decoding the JWT, verifying the signature, and extracting the user information from the payload. The following sections detail these steps using Python, a popular language for serverless development.First, the JWT must be decoded. This is typically done using a library that supports JWT operations. Once decoded, the signature of the JWT needs to be verified.
This ensures that the JWT has not been tampered with and that it was issued by a trusted source. The verification process uses the secret key used during the JWT’s generation. Finally, the payload of the JWT is accessed, which contains the user’s identity and any other relevant claims.Here is a Python example demonstrating the process:“`pythonimport jwtdef validate_jwt(token, secret_key): “”” Validates a JWT token.
Args: token (str): The JWT token. secret_key (str): The secret key used to sign the token. Returns: dict: The decoded payload if the token is valid, None otherwise. “”” try: payload = jwt.decode(token, secret_key, algorithms=[‘HS256’]) # Use the appropriate algorithm return payload except jwt.ExpiredSignatureError: print(“Token has expired”) return None except jwt.InvalidTokenError: print(“Invalid token”) return None# Example usage:token = “eyJhbGciOiJIUzI1NiIsInR5cCI6IkpXVCJ9.eyJzdWIiOiIxMjM0NTY3ODkwIiwibmFtZSI6IkpvaG4gRG9lIiwiaWF0IjoxNTE2MjM5MDIyfQ.SflKxwRJSMeKKF2QT4fwpMeJf36POk6yJV_adQssw5c” # Example JWT (replace with a real one)secret_key = “your-secret-key” # Replace with your actual secret keydecoded_payload = validate_jwt(token, secret_key)if decoded_payload: print(“Token is valid”) print(f”Payload: decoded_payload”) user_id = decoded_payload.get(‘sub’) # Access user information from the payload print(f”User ID: user_id”)else: print(“Token is invalid”)“`In this example:* The `jwt` library is used for JWT operations.
Install it using `pip install PyJWT`.
- The `validate_jwt` function takes the JWT token and the secret key as input.
- The `jwt.decode()` function attempts to decode and verify the token using the provided secret key and the algorithm used during token creation (HS256 in this example).
- Error handling is included to catch `ExpiredSignatureError` (token expired) and `InvalidTokenError` (invalid token), returning `None` in case of an error.
- The example extracts the `sub` claim (subject, typically the user ID) from the payload.
Extracting User Information from the JWT Payload
Once the JWT is validated, the user information stored within the payload can be accessed. The payload is a JSON object containing claims, which are key-value pairs. These claims can include the user’s ID, username, roles, permissions, and other relevant data.The structure of the payload depends on how the JWT was created. However, standard claims like `sub` (subject), `iss` (issuer), `aud` (audience), `exp` (expiration time), `iat` (issued at), and `nbf` (not before) are commonly used.
The specific claims used in your JWTs should be defined during the token generation process.Consider the following JSON structure as an example of a JWT payload:“`json “sub”: “1234567890”, “name”: “John Doe”, “iat”: 1516239022, “role”: “admin”“`In the provided Python example, after successful validation, the `decoded_payload` variable holds this JSON object. The example then demonstrates how to access specific claims, such as the user ID (`sub`) and the role (`role`), using the `get()` method.By extracting and using the user information from the JWT payload, you can:* Implement Role-Based Access Control (RBAC): Grant or deny access to specific resources based on the user’s role (e.g., “admin”, “user”).
Personalize API Responses
Customize the data returned by the API based on the user’s identity.
Track User Activity
Log user actions and interactions within the API.
Enforce Authorization Rules
Ensure users are authorized to perform specific actions based on their claims.
Refreshing JWTs and Handling Expiration
Implementing a robust refresh mechanism is crucial for maintaining a secure and user-friendly authentication system in a serverless API environment. JWTs, by design, have a limited lifespan to mitigate the impact of compromised tokens. However, forcing users to repeatedly re-authenticate after each token expiration creates a poor user experience. Refresh tokens provide a mechanism to obtain new access tokens without requiring the user to re-enter their credentials, significantly improving usability while upholding security standards.
Importance of Implementing JWT Refresh Mechanisms
The primary purpose of a refresh mechanism is to extend a user’s authenticated session without necessitating repeated password entry. This is achieved by issuing a refresh token alongside the initial access token. The access token is used for authenticating API requests, while the refresh token is used to obtain new access tokens when the current one expires. This design provides several key benefits:
- Improved User Experience: Eliminates the need for frequent re-authentication, leading to a smoother and more seamless user experience. Users remain logged in for extended periods without interruption, provided they have a valid refresh token.
- Enhanced Security: Reduces the attack surface. Short-lived access tokens minimize the window of opportunity for malicious actors to exploit a compromised token. Refresh tokens, while more persistent, can be managed with additional security measures like rotation and revocation.
- Increased Flexibility: Allows for the adjustment of access token lifetimes without impacting the user experience. The access token can be configured to expire more frequently for increased security, while the refresh token can have a longer lifespan.
- Reduced Password Exposure: Users are not constantly required to re-enter their passwords, reducing the risk of password exposure through phishing or keylogging attacks.
Generating and Handling Refresh Tokens
Generating and handling refresh tokens requires careful consideration of security best practices. The refresh token should be stored securely, ideally on the server-side or in a secure, encrypted storage. The process involves generating a unique refresh token, associating it with a user, and storing it. The refresh token is then used to issue new access tokens.
- Token Generation: Refresh tokens, similar to JWTs, should be cryptographically secure. Generate them using a cryptographically secure pseudorandom number generator (CSPRNG). Consider using UUIDs (Universally Unique Identifiers) to ensure uniqueness and reduce the likelihood of collisions.
- Token Storage: Refresh tokens should be stored securely. Avoid storing them in client-side storage (e.g., local storage, cookies) due to their vulnerability to cross-site scripting (XSS) attacks. Recommended storage options include:
- Database: Store refresh tokens in a database, associating each token with a user ID and an expiration time. This allows for easy token management, rotation, and revocation.
- Redis/Memcached: Use an in-memory data store for faster access and retrieval, particularly useful for high-traffic APIs. Consider using a caching strategy to handle token expiration.
- Server-side Sessions: If your serverless architecture supports server-side sessions, refresh tokens can be managed within the session data. However, be mindful of the stateless nature of serverless functions and ensure session persistence.
- Token Issuance: When a user successfully authenticates, generate both an access token (JWT) and a refresh token. Return both tokens to the client. The access token is used for API requests, and the refresh token is used to obtain new access tokens when the current one expires.
- Refresh Token Request: When the access token expires, the client sends the refresh token to a dedicated refresh endpoint.
- Token Validation: Upon receiving a refresh token, the server validates it. This includes checking:
- Token Validity: Ensure the token is not expired and has not been revoked.
- Token Signature: Verify the signature of the refresh token.
- Token Association: Confirm the refresh token is associated with a valid user.
- New Access Token Issuance: If the refresh token is valid, generate a new access token (JWT) and return it to the client. Ideally, issue a new refresh token as well (token rotation).
Implementing Refresh Token Rotation and Revocation
Refresh token rotation and revocation are essential security practices for mitigating the risks associated with compromised refresh tokens. Rotation involves issuing a new refresh token every time a new access token is requested using the current refresh token. Revocation allows for invalidating refresh tokens, preventing their further use.
- Refresh Token Rotation: Rotate refresh tokens to enhance security. When a refresh token is used to obtain a new access token, issue a
-new* refresh token alongside the new access token. The old refresh token should be invalidated (revoked). This practice limits the window of opportunity for attackers. - Token Revocation: Implement a mechanism to revoke refresh tokens. This is crucial for scenarios such as:
- User Logout: When a user logs out, revoke all associated refresh tokens.
- Account Suspension: If a user’s account is suspended, revoke all associated refresh tokens.
- Suspicious Activity: If suspicious activity is detected, such as multiple failed login attempts or unusual API request patterns, revoke the refresh tokens.
- Compromise Detection: If a refresh token is suspected of being compromised, revoke it immediately.
- Revocation Strategies:
- Token Blacklisting: Maintain a blacklist of revoked refresh tokens. When a refresh token is received, check if it exists in the blacklist. This approach is straightforward to implement but can become resource-intensive with a large number of revoked tokens.
- Database Updates: When a refresh token is revoked, update the database record associated with that token to mark it as invalid. This is a more scalable approach.
- Token Versioning: Include a version number in the refresh token. When a refresh token is rotated, increment the version number. The server only accepts the latest version of a refresh token.
- Implementation Example (Conceptual): Consider a database table storing refresh tokens with the following columns: `token`, `user_id`, `expiry_date`, `revoked`, and `version`.
- When a refresh token is used, and a new access token is issued, generate a new refresh token.
- Update the old refresh token’s `revoked` field to `true` in the database.
- Store the new refresh token in the database with a new `version` value.
- During refresh token validation, check if the token is revoked, expired, and its version is the latest.
Security Best Practices for JWT Authentication
Implementing JWT authentication in a serverless API, while offering flexibility and scalability, necessitates careful consideration of security vulnerabilities. A poorly secured implementation can expose sensitive user data and compromise the integrity of the API. This section details critical security best practices to mitigate common threats associated with JWTs, ensuring a robust and secure authentication system.
Common Security Vulnerabilities Associated with JWTs
Several vulnerabilities can arise during the implementation of JWT authentication. Understanding these weaknesses is crucial for building a resilient system.
- Secret Key Compromise: A compromised secret key allows attackers to forge valid JWTs, granting unauthorized access to protected resources. This is perhaps the most critical vulnerability. If an attacker gains access to the secret key, they can create JWTs with any claims they desire, effectively impersonating any user.
- Token Theft: Attackers can steal valid JWTs through various means, such as cross-site scripting (XSS) attacks, man-in-the-middle (MITM) attacks, or malware. Once stolen, the attacker can use the token to access the API as the legitimate user.
- Replay Attacks: An attacker intercepts a valid JWT and resubmits it to the API at a later time. This attack is successful if the token has not expired and the API does not implement proper token validation mechanisms, such as checking for token revocation or implementing a “one-time use” token mechanism.
- Token Injection: An attacker injects a malicious JWT into the request headers, potentially bypassing authentication if the API doesn’t properly validate the token’s integrity. This can occur if the API accepts user-controlled data that influences JWT processing.
- Algorithm Downgrading: An attacker attempts to force the API to use a weaker or compromised signing algorithm, such as `HS256` instead of `RS256`. This is especially dangerous if the secret key for `HS256` is easily guessed or compromised.
- Lack of Proper Validation: Insufficient validation of JWT claims, such as the issuer (`iss`), audience (`aud`), and expiration time (`exp`), can lead to security breaches. For instance, if the `aud` claim is not validated, an attacker could potentially use a token intended for a different application to access the API.
Guidelines for Securely Storing and Managing Secret Keys
The security of the secret key is paramount. Protecting it is the single most important factor in securing a JWT-based authentication system.
- Use Strong Secret Keys: Generate a cryptographically strong secret key. For `HS256` (symmetric signing), the key should be at least 256 bits (32 bytes) long. For `RS256` or `ES256` (asymmetric signing), the private key should be generated using a secure random number generator and stored securely. Consider using a dedicated key management system (KMS) such as AWS KMS or Azure Key Vault.
- Avoid Hardcoding Secrets: Never hardcode the secret key directly into your application code. This makes it vulnerable to accidental exposure through version control systems or code repositories.
- Environment Variables: Store the secret key as an environment variable. This allows for easy configuration and modification without changing the code. Securely manage environment variables using services like AWS Secrets Manager or HashiCorp Vault.
- Key Rotation: Implement key rotation policies. Regularly rotate the secret key to mitigate the impact of a potential key compromise. This involves generating a new key, updating the application to use the new key, and invalidating tokens signed with the old key.
- Access Control: Restrict access to the secret key. Grant access only to authorized personnel and systems. Use role-based access control (RBAC) to ensure that only necessary privileges are granted.
- Regular Audits: Conduct regular security audits of the key management system and application code to identify potential vulnerabilities and ensure compliance with security best practices.
Best Practices for Mitigating Attacks such as Token Theft and Replay Attacks
Implementing additional security measures can significantly reduce the risk of token theft and replay attacks.
- Implement HTTPS: Always use HTTPS to encrypt all communication between the client and the server. This prevents attackers from intercepting and stealing tokens in transit. HTTPS encrypts the data, making it unreadable to eavesdroppers.
- Use Token Expiration: Set a reasonable expiration time for JWTs. Shorter expiration times limit the window of opportunity for attackers. However, consider the trade-off between security and user experience. Shorter expiration times require more frequent token refreshing, which can impact the user experience.
- Token Refreshing: Implement a token refreshing mechanism. When a JWT expires, the client should request a new JWT using a refresh token. This allows for longer user sessions without compromising security. The refresh token itself should also have an expiration time and be stored securely.
- Token Revocation: Implement token revocation. Provide a mechanism to invalidate JWTs before they expire. This is crucial in cases of suspected compromise or user logout. Store revoked tokens in a database or cache for efficient lookup.
- Implement a “One-Time Use” Token Mechanism: For sensitive operations, consider implementing a mechanism where each token can only be used once. This mitigates replay attacks. This can be achieved by associating tokens with a unique identifier (e.g., a nonce) and tracking their usage.
- Use a Secure HTTP Only Cookie: For web applications, store the JWT in an HTTP-only cookie. This prevents JavaScript from accessing the token, mitigating the risk of XSS attacks. The cookie should also be set with the `Secure` flag, ensuring it is only transmitted over HTTPS.
- Implement Rate Limiting: Implement rate limiting to prevent brute-force attacks and limit the impact of compromised credentials. This limits the number of requests a client can make within a given time period.
- Validate Token Claims: Always validate the token claims, such as `iss`, `aud`, and `exp`, to ensure the token is valid and intended for the API. Reject tokens that do not meet the expected criteria.
- Monitor for Suspicious Activity: Implement logging and monitoring to detect suspicious activity, such as multiple failed login attempts, unusual API access patterns, or attempts to access protected resources from unfamiliar IP addresses. Implement alerts to notify security teams of potential threats.
Testing and Debugging JWT Authentication
Thorough testing and effective debugging are crucial for a robust and secure JWT authentication implementation in a serverless API. Rigorous testing validates the correct functioning of JWT generation, validation, and authorization processes, ensuring the API behaves as expected under various conditions. Effective debugging allows for the rapid identification and resolution of issues, preventing security vulnerabilities and ensuring a seamless user experience.
Importance of Testing JWT Authentication Implementations
Testing JWT authentication is paramount to ensure the security and reliability of the API. Without comprehensive testing, vulnerabilities can be introduced, potentially allowing unauthorized access to sensitive data or API functionalities. It verifies the proper handling of different scenarios, such as valid and invalid JWTs, expired tokens, and unauthorized access attempts.
- Security Validation: Testing helps confirm that only authorized users can access protected resources. It ensures the correct implementation of authorization rules based on JWT claims, such as roles or permissions.
- Error Handling Verification: Tests should validate the API’s response to various JWT-related errors, such as invalid signatures, expired tokens, or missing tokens. Proper error handling prevents information leakage and provides informative error messages to clients.
- Performance and Scalability: Testing helps assess the performance impact of JWT validation, especially under high load. It ensures the API can handle a large number of concurrent requests without significant performance degradation.
- Compliance and Regulatory Requirements: Depending on the application, JWT authentication must adhere to specific security standards and regulations. Testing confirms that the implementation complies with these requirements.
Methods for Testing JWT Validation and Authorization
Testing JWT validation and authorization requires a multi-faceted approach, utilizing various tools and techniques to cover different scenarios. This includes using tools to generate JWTs, simulating different user roles, and analyzing API responses.
- Automated Testing Frameworks: Employing automated testing frameworks such as Jest, Mocha, or Pytest facilitates the creation of repeatable and maintainable tests. These frameworks allow for the execution of tests against the API endpoints, verifying the expected behavior. Tests can be written to cover scenarios such as:
- Valid JWT authentication.
- Invalid JWT authentication (e.g., tampered signature, expired token).
- Unauthorized access attempts based on JWT claims.
- API Testing Tools: Tools like Postman, Insomnia, or curl are useful for manually testing API endpoints and inspecting responses. These tools enable sending requests with different JWTs and verifying the returned status codes and data.
- Postman, for example, allows creating collections of tests that can be run repeatedly.
- curl provides a command-line interface for sending HTTP requests, useful for scripting and automation.
- JWT Debuggers and Validators: Using online JWT debuggers or validators, such as jwt.io, helps decode and inspect JWTs to verify their structure, claims, and signature. These tools are invaluable for understanding the content of a JWT and identifying any issues.
- These tools can quickly determine if a JWT is valid, identify the algorithm used for signing, and inspect the claims contained within the payload.
- Mocking and Stubbing: When testing Lambda functions that validate JWTs, mocking the JWT library can be beneficial. This allows simulating different JWT scenarios (e.g., expired, invalid signature) without relying on actual JWT generation and signing.
Demonstrating How to Debug JWT-Related Issues and Troubleshoot Common Problems
Debugging JWT-related issues often involves a systematic approach, starting with the analysis of error messages and API responses, and then using various tools to identify the root cause. Common problems include invalid signatures, expired tokens, and incorrect claims.
- Analyzing Error Messages: Carefully examine error messages returned by the API. These messages often provide valuable clues about the problem. For example, an “Invalid signature” error suggests a problem with the JWT signing process or a tampered token. An “Expired token” error indicates the token’s expiration time has passed.
- Using JWT Debuggers: Decode the JWT using a JWT debugger (e.g., jwt.io) to inspect its payload and verify the claims. Ensure the `iss` (issuer), `aud` (audience), `sub` (subject), and other claims are correct and match the expected values.
- Checking the Signing Secret: Verify the correct signing secret is used for generating and validating JWTs. A mismatch in the secret will result in an “Invalid signature” error. Ensure the secret is securely stored and not exposed in the code or configuration.
- Verifying Token Expiration: Ensure the token’s `exp` (expiration time) claim is set correctly. The server should reject expired tokens. Use a JWT debugger to confirm the token’s expiration time and compare it to the current time.
- Examining API Gateway and Lambda Logs: Check the logs in the API Gateway and Lambda functions for any errors or unexpected behavior. These logs provide detailed information about the request and response, including any errors that occurred during JWT validation or authorization. CloudWatch logs are particularly useful in this context.
- Testing Authorization Rules: If authorization rules are based on JWT claims (e.g., roles or permissions), verify these rules are correctly implemented. Test different user roles to ensure they have the appropriate access to protected resources.
- Handling Clock Skew: Consider clock skew issues, where the server and client clocks may be slightly out of sync. Implement a grace period or use a library that handles clock skew automatically to avoid false-positive expiration errors.
Epilogue
In conclusion, integrating JWT authentication into a serverless API provides a robust and scalable solution for securing sensitive data and resources. By understanding the fundamentals of JWTs, leveraging serverless architectures, and adhering to security best practices, developers can create highly secure and efficient APIs. This guide has illuminated the essential steps, from selecting appropriate libraries to implementing refresh mechanisms and mitigating vulnerabilities.
Embracing JWT authentication empowers developers to build resilient and trustworthy serverless applications that meet the demands of modern web development, ensuring a secure and seamless user experience.
Clarifying Questions
What is the difference between JWT and session-based authentication?
JWT authentication is stateless; each request includes a token containing user information, validated independently by the server. Session-based authentication stores user data on the server, requiring a session ID transmitted in each request. JWT offers better scalability and simplifies API design due to its stateless nature, while session-based authentication can be simpler to implement initially but becomes less efficient at scale.
How do I handle JWTs on the client-side?
Clients typically store JWTs in local storage, session storage, or HTTP-only cookies. Upon successful authentication, the server issues a JWT, which the client includes in the `Authorization` header of subsequent requests (e.g., `Authorization: Bearer
What are refresh tokens and why are they important?
Refresh tokens are used to obtain new JWTs without requiring the user to re-enter their credentials. They are issued alongside JWTs and have a longer lifespan. Refresh tokens are essential because they allow for shorter-lived JWTs, which reduces the impact of a compromised token. Implementing refresh tokens enhances security by minimizing the window of opportunity for attackers.
How do I protect my secret key?
The secret key is crucial for signing and verifying JWTs. It should be stored securely, ideally using environment variables or a secrets management service. Never hardcode the key in your code. Regularly rotate the key and restrict access to the key to authorized personnel only. Consider using hardware security modules (HSMs) for enhanced protection.